Small investments, big yields for gardeners with patience
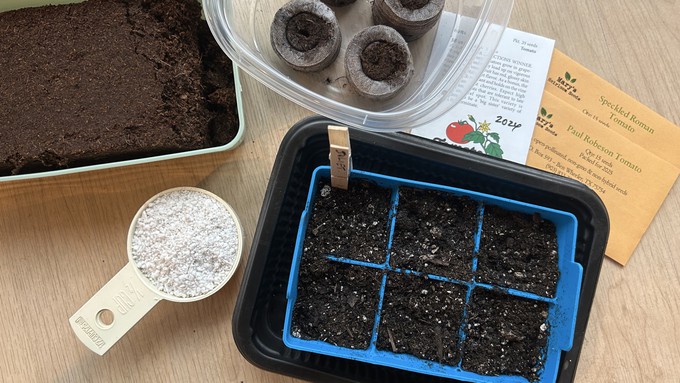
Here are some items that are useful for seed-starting: Clockwise from top left, a tray of rehydrated coconut coir, a food storage container with 4 expanded pellets, seed packages, a silicone 6-pack with seed starting mix, and a measuring cup with perlite. Kathy Morrison
Welcome to Food in My Back Yard!
With food sources and budget concerns on many minds these days, Debbie Arrington and I decided that we wanted to help Sacramento-area gardeners -- especially new ones --grow more of their own food this year.
This new series of FIMBY blog posts will appear every Tuesday (we hope) through the active outdoor growing season. In Sacramento, that's practically all year, so we plan to publish plenty of tips on preparing to grow, maintaining and harvesting homegrown food.
And this won't be limited to gardeners with acreage. Even a balcony container garden can yield salad fixings, peppers, herbs and other homegrown delights.
February is prime seed-starting month for summer vegetables that should be started indoors. That primarily is tomatoes and all varieties of peppers, as well as eggplant. And that's because of how long it takes to produce a plant that will be big enough to transplant when the weather and soil are warm enough.
Tomato seeds started now should be ready to plant out in early April. More important than the date, though, is when the soil temperature is consistently 60 degrees or above.
Note: Seeds are still a bargain, but the first year of seed starting usually involves a little bit of an investment. You do NOT need a full seed-starting system -- fancy lights and all -- that online garden companies are so eager to sell. As much as possible, repurpose items you already have around the house or garden. Tip: Explore your local dollar store, where I recently found compressed coir bricks, several sizes of trays, a small watering can, clothes pins and sets of small pots for later transplanting.
Now, before you begin ripping open seed packages, here's an important List of Necessities for Seed Starting:
-- Source of warmth. Summer vegetables all need warm soil to germinate. The warmest room in the house plus a seed-starting mat often is the best combination, especially for peppers, which are notoriously slow to germinate (more on that below). For years I've used the top of my refrigerator for most of my tomatoes. Other warm spots could include an area near a heating vent, on top of a cable box, or over a box containing old-fashioned Christmas lights. (The heat needs to be consistent, so those lights would have to stay on.) Fancier heating mats have thermostats. Now you also need:
-- Planting medium. Pre-mixed seed starting mix, available in bags, is a good choice for a beginner. The medium should be light, with some vermiculite and/or perlite, but should not feel like sand. And don't confuse seed starting mix with potting soil, which can be too heavy for seeds to push their first roots out. To make your own seed starter mix, one reliable combination is equal parts perlite, coir and fine compost. The compressed pellets filled with coir or peat often are a good choice if you want to start just a few seeds, or need to distribute them, as for a class project.
-- Containers. To hold the medium, use clean plastic six-packs (purchased or reused), toilet paper tubes, individual containers made from newsprint (assuming you can find a paper these days) or clean plastic yogurt containers with holes punched in the bottom. Drainage is crucial, so set the containers in a tray or dish that can handle some heat. I like to reuse plastic containers from salad greens to hold my sixpacks. Plastic food storage containers and old Pyrex casseroles also are excellent for this. You'll also need something such as plastic wrap to cover the container to keep in moisture (though not vacuum airtight). Yes, you also need:
-- Source of moisture. The medium for the seeds needs to stay moist but not soggy. Drainage is important. "Damping off" (when a seedling collapses suddenly) can occur when the surface of the medium is too cold and wet. This is why one trend of starting in eggshells (as if you could afford it right now!) is not recommended. Here's a great summary of "damping off" causes and prevention. Then there's:
-- Darkness. Seeds need to be buried at the proper depth -- check the package. And a darkened room or area helps. That's until shoots appear. Then you'll need:
-- A source of light. If you've ever seen a leggy transplant, you know it is a plant that has been screaming for light -- and trying to find it. Once seeds are germinated, you'll remove the cover (the plastic wrap, for example) and move the seed container into the light. Ideally, that's under a movable light source, such as a fluorescent work light that can be raised and lowered. For seedlings, the light should be just a few inches (but not touching) the top leaves. A sunny south-facing window can work, but you'll have to remember to turn the plants daily so they grow straight. They still need some darkness -- at least 6 hours a day. But good light is crucial.
-- Patience! Also attention. Seeds grow on their own time, but they can't be left alone for days, like a pet fish. Check in on them daily or twice a day, to see if the soil has dried out, the light needs moving, or even if they've sprouted.
Other items I've found useful: Tweezers for grabbing seeds; wooden skewers for poking holes -- especially one marked with measurements 1/4-inch, 1/2-inch and 1-inch for checking soil depth; pencils; wooden clothes pins (great for marking sixpacks or closing seed packages); a short dowel for tamping soil over seeds; painter's or masking tape for attaching plastic wrap to sixpacks.
We're mostly talking about tomatoes and peppers right now. Eggplants can be started now, too. Want to start beans, corn, cucumbers, melons, squash or pumpkins? Around Sacramento, those are best grown via direct seeding in the garden, and will need the warm soil of late April, all of May and June, even early July.
My last bit of advice: Be realistic about how many plants you're starting. I start two or three tomatoes per variety for myself, in case of mishaps, and four to six per variety that I plan to share. That's still quite a few, easily 72 to 80 plants. And that's before the peppers!
This is a lot of information for one post, but I do have to include these excellent links to continue the seed-starting discussion:
The Sacramento master gardeners' website has many links to great seed-starting and growing information. The home vegetable page is here. Scroll down to find links to these PDFs:
-- Seed packet information explained. (GN 128)
-- Chart for optimum soil temperature conditions for vegetable seed germination (GN 154)
-- Vegetable planting schedule, including seeding indoors (EHN 11)
-- Vegetable gardening 101, a 7-page guide to everything, but it includes starting seeds. (EHN 96)
And Farmer Fred Hoffman has a great post on the best ways to get stubborn pepper seeds to germinate (on his page at this point).
Comments
0 comments have been posted.Sacramento Digs Gardening to your inbox.
Flowers in My Back Yard Series
July 7: Grow these bright cosmos for bees and butterflies
June 30: Agapanthus adds blue fireworks to the garden
June 23: Easy-care gazanias fill those hot corners
June 16: Daylilies are perfect for water-wise gardens (and a lot more)
June 9: Grow coneflowers for pollinators -- and yourself
June 2: Sunflowers capture Sacramento's summer attitude
May 29: Are your roses going 'blind'?
May 26: Zinnias are the summer flowers every garden needs
May 19: Plant dahlias now for late-summer flower power
May 12: Know your coreopsis from your bidens
May 5: Mums the word on Mother's Day weekend
April 28: Majestic Matilija poppy is worth a look
April 21: Celebrate roses, America's favorite flower
April 14: Small flowers with outsized impact
April 7: Calendulas do double duty
April 3: Make Easter lilies last for years to come
March 31: In praise of a pollinator magnet (small-leaf salvias)
March 24: Azaleas brighten shady spots
March 17: The perfect flower for beginners? Try zonal geraniums
March 10: Keep camellias happy for years to come
March 3: Fruit tree blossoms are a fleeting joy
Feb. 27: Are your roses looking rusty?
Feb. 24: Treasure spring daffodils now and for years to come
Feb. 17: How and why to grow wildflowers
Feb. 10: Let's talk Valentine's Day roses
Feb. 3: Why grow flowers?
Local News

Sites We Like
Garden checklist for week of July 12
Get out early in the morning to take care of garden chores. Temperatures are expected to stay below 80 degrees before 10 a.m.
* Remember to water early and deep; your garden depends on you.
* It’s not too late to add a splash of color. Plant petunias, snapdragons, zinnias and marigolds.
* From seed, plant corn, pumpkins, radishes, winter squash and sunflowers.
* Keep your vegetable garden watered, mulched and weeded. Water before 8 a.m. to reduce the chance of fungal infection and to conserve moisture.
* Water before fertilizing vegetables and blooming annuals, perennials and shrubs to give them a boost. Feeding flowering plants every other week will extend their bloom.
* Feed vegetable plants bone meal or other fertilizers high in phosphate to stimulate more blooms and fruiting.
* Don’t let tomatoes wilt or dry out completely. Give tomatoes a deep watering two to three times a week. Harvest vegetables promptly to encourage plants to produce more. Squash especially tends to grow rapidly in hot weather. Keep an eye on zucchini.
* If your melons and squash aren’t setting fruit, give the bees a hand. With a small, soft paintbrush, gather some pollen from male flowers, then brush it inside the female flowers, which have a tiny swelling at the base of their petals. (That's the embryo melon or squash.) Within days, that little swelling should start growing.
* Pinch back chrysanthemums for bushy plants and more flowers in September.
* Remove spent flowers from roses, daylilies and other bloomers as they finish flowering.
* Pinch off blooms from basil so the plant will grow more leaves.
* Cut back lavender after flowering to promote a second bloom.
Contact Us
Send us a gardening question, a post suggestion or information about an upcoming event. sacdigsgardening@gmail.com
Food in My Back Yard (FIMBY) Series
Lessons learned during a year of edible gardening
WINTER
Is edible gardening possible indoors?
Hints for choosing tomato seeds
Why winter is the perfect time to plant fruit trees
When to plant? Consider staggering your transplants
How to squeeze more food into less space
Plant a fruit tree now -- for later
Win the weed war by tackling them in winter
Tips for planting bare-root trees, shrubs and vegetables
Time to give vegetable seedlings some more space
Ways to win the fight against weeds
FALL
Dec. 16: Add asparagus to your edible garden
Dec. 9: Soggy soil and what to do about it
Dec. 2: Plant artichokes now; enjoy for years to come
Nov. 25: It's late November, and your peach tree needs spraying
Nov. 18: What to do with all those fallen leaves?
Nov. 11: Prepare now for colder weather in the edible garden
Nov. 4: Plant a pea patch for you and your garden
Oct. 27: As citrus season begins, advice for backyard growers
Oct. 20: Change is in the autumn air
Oct. 13: We don't talk (enough) about beets
Oct. 6: Fava beans do double duty
Sept. 30: Seeds or transplants for cool-season veggies?
Sept. 23: How to prolong the fall tomato harvest
SUMMER
Sept. 16: Time to shut it down?
Sept. 9: How to get the most out of your pumpkin patch
Sept. 2: Summer-to-fall transition time for evaluation, planning
Aug. 26: To pick or not to pick those tomatoes?
Aug. 19: Put worms to work for you
Aug. 12: Grow food while saving water
Aug. 5: Enhance your food with edible flowers
July 29: Why won't my tomatoes turn red?
July 22: A squash plant has mosaic virus, and it's not pretty
July 15: Does this plant need water?
July 8: Tear out that sad plant or baby it? Midsummer decisions
July 1: How to grow summer salad greens
June 24: Weird stuff that's perfectly normal
SPRING
June 17: Help pollinators help your garden
June 10: Battling early-season tomato pests
June 3: Make your own compost
May 27: Where are the bees when you need them?
May 20: How to help tomatoes thrive on hot days
May 13: Your plants can tell you more than any calendar can
May 6: Maintain soil moisture with mulch for garden success
April 29: What's (already) wrong with my tomato plants?
April 22: Should you stock up on fertilizer? (Yes!)
April 15: Grow culinary herbs in containers
April 8: When to plant summer vegetables
April 1: Don't be fooled by these garden myths
March 25: Fertilizer tips: How to 'feed' your vegetables for healthy growth
 Powered by California Local


