How to replace turf, prepare soil for future planting
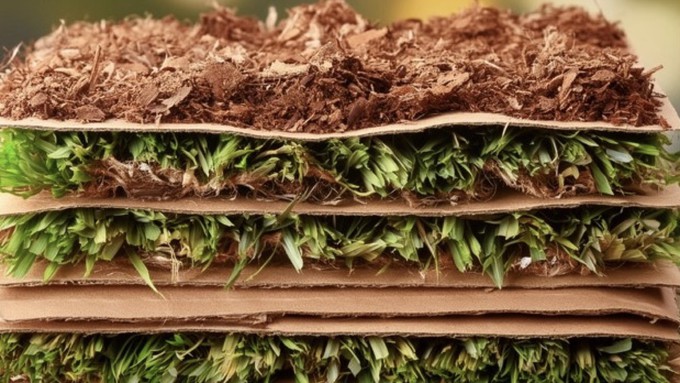
Layered cardboard, green matter (such as garden clippings) and brown matter (such as leaves or straw) makes "lawn lasagna." See "How to Make Lawn Lasagna" at the end of the post. Courtesy BeWaterSmart.info
Is this the summer you finally ditch your lawn? Let our heat be your helper. Summer sun can speed up an easy method of turf removal: Sheet mulching.
“Creating a water-wise landscape can be intimidating,” notes Joanna Solins, environmental horticulture adviser for the UC Cooperative Extension in Sacramento, Solano and Yolo counties. “I think that sheet mulching provides an approachable option for some people, as it’s possible to DIY.”
Sheet mulching is a technique that layers compost, mulch and weed barriers (such as cardboard) on top of the turf. These layers smother the lawn, which eventually breaks down in place. When it comes time to plant, holes are poked through the layers.
“I recommend doing it in the spring or summer,” says Ryan Burnett, interim manager for the City of West Sacramento’s Environmental Services and Sustainability Division. “Once it’s in place, the summer heat comes and you get solarization help. It’s not only covered, but the grass that’s there is getting baked.”
To entice customers to try sheet mulching, the City of West Sacramento offers a “Lawn Begone” voucher worth up to $300 toward compost and mulch. In less than a year, the program has paid vouchers for the removal of up to 27,000 square feet of lawn.
Other water providers offer similar programs or rebates. Find information and links for your provider at https://bewatersmart.info/.
“The voucher program gets people started,” Burnett says. “It’s a big undertaking to go from grass to a full California water-wise landscape. Do the first stage, which is just covering (the turf).”
With sheet mulching, there’s no sod cutting, no loss of top soil and a lot less waste.
“One big benefit of sheet mulching: You’re not digging things up,” Burnett says. “Ripping out a lawn needs heavy equipment; it gets very expensive. Once it’s ripped out, where are you going to put it? You’re removing your topsoil, too.”
Leaving the lawn where it is to decompose not only solves that waste issue, but keeps a lid on weed seeds lurking underneath the turf.
“I like that sheet mulching can be low cost and low waste,” Solins says. “The major known benefits of sheet mulching are that the turf stays in place and breaks down instead of being removed and taken to the landfill, and that it is possible to carry out a full landscape transformation on a small budget and without necessarily using the help of professional landscapers.”
Burnett used sheet mulching at his own West Sacramento home to eliminate Bermuda grass lawns in both his front and backyards. He estimated his new water-wise landscape uses “10 times less water” than the former lawns and requires a lot less work.
His experience also taught him how not to sheet mulch.
“When you do it the wrong way, it’s the worst of both worlds,” he says. “If you put the mulch right on top of the grass with no other barriers (such as cardboard or weed cloth), within two weeks, it will be a real mess with the grass and mulch all mixed together. It doesn’t kill the grass; it feeds it.”
Solins adds, “I think some of the worst drawbacks are seen when people don’t put enough mulch on or wait to mulch. The cardboard shows through and looks very messy, and won’t effectively kill the turf.”
Burnett offers these additional tips:
– Mow the lawn to be removed as short as possible.
– Dig a 6-inch trench around the edges of the area. “That’s where the grass is going to grow back first,” he says. Use the trench to anchor the edges of the cardboard, weed cloth or other weed barrier.
– Shut off irrigation to the area being sheet mulched. Cap the sprinklers and convert them to drip. If you’re going to do this later, remember to mark the sprinkler locations with flags or stakes so you can find them under the layers.
For more tips: https://sacmg.ucanr.edu/Beyond_Lawn/.
How to make ‘lawn lasagna’
Sheet mulching is a great way to convert lawn or other flat landscape areas into healthy garden space. Its layers earned this method the nickname “lawn lasagna”; like horizontal composting, those layers “cook” down in time.
This method also maintains soil moisture, which is critical for both microorganisms and future plants. When ready, plant right through the layers – no tilling necessary.
In the Sacramento area, sheet mulching can be started in early summer or fall. Starting in summer makes use of our abundant heat to speed the decomposition process. When started in fall, autumn leaves can be used as one or more of the layers and winter rain will keep the layers moist (another plus).
One small space can be done at a time — or do the whole lawn. To make your own lawn lasagna, follow these steps for each area of turf to be removed:
1. Mow the lawn as short as possible. Leave clippings in place.
2. Water by hand. Really give the area a deep soaking.
3. Cover with weed barrier such as two or three layers of cardboard, builders paper or several thicknesses of newsprint (no glossy paper). Overlap the edges 4 to 6 inches.
4. Water. Thoroughly wet the cardboard or newsprint.
5. Cover with 1-inch layer of steer or horse manure or compost. Water lightly.
6. Cover with a 2-inch layer of dried leaves, straw, shredded newsprint or other dried or “brown” material. Water lightly.
7. Cover with a 1-inch layer of “green” material, such as more manure, lawn clippings, garden trimmings or vegetable scraps. Cut green ingredients into 2-inch pieces or smaller. Water lightly.
8. Layer more browns and greens until the area is under at least 8 to 12 inches of material. Water lightly after each layer. Finish with a brown layer such as wood chips.
9. Wait. Water only occasionally as needed; compost needs moisture to break down. Expect this step to take three to four months, or more. Areas sheet mulched in June will be ready to plant in fall.
10. Plant. No turning necessary; plant directly through layers.
Comments
0 comments have been posted.Sacramento Digs Gardening to your inbox.
Flowers in My Back Yard Series
July 14: How to keep hydrangeas happy
July 7: Grow these bright cosmos for bees and butterflies
June 30: Agapanthus adds blue fireworks to the garden
June 23: Easy-care gazanias fill those hot corners
June 16: Daylilies are perfect for water-wise gardens (and a lot more)
June 9: Grow coneflowers for pollinators -- and yourself
June 2: Sunflowers capture Sacramento's summer attitude
May 29: Are your roses going 'blind'?
May 26: Zinnias are the summer flowers every garden needs
May 19: Plant dahlias now for late-summer flower power
May 12: Know your coreopsis from your bidens
May 5: Mums the word on Mother's Day weekend
April 28: Majestic Matilija poppy is worth a look
April 21: Celebrate roses, America's favorite flower
April 14: Small flowers with outsized impact
April 7: Calendulas do double duty
April 3: Make Easter lilies last for years to come
March 31: In praise of a pollinator magnet (small-leaf salvias)
March 24: Azaleas brighten shady spots
March 17: The perfect flower for beginners? Try zonal geraniums
March 10: Keep camellias happy for years to come
March 3: Fruit tree blossoms are a fleeting joy
Feb. 27: Are your roses looking rusty?
Feb. 24: Treasure spring daffodils now and for years to come
Feb. 17: How and why to grow wildflowers
Feb. 10: Let's talk Valentine's Day roses
Feb. 3: Why grow flowers?
Local News

Sites We Like
Garden checklist for week of July 19
Remember to water early and deeply; your garden depends on you.
* It’s not too late to add a splash of color. Plant petunias, snapdragons, zinnias and marigolds.
* From seed, plant corn, pumpkins, radishes, winter squash and sunflowers.
* Keep your vegetable garden watered, mulched and weeded. Water before 8 a.m. to reduce the chance of fungal infection and to conserve moisture.
* Water, then fertilize vegetables and blooming annuals, perennials and shrubs to give them a boost.
*Fertilizing flowering plants every other week will extend their bloom. Give vegetable plants bone meal or other fertilizers high in phosphate to stimulate more blooms and fruiting.
* Don’t let tomatoes wilt or dry out completely. Give tomatoes a deep watering two to three times a week. Harvest vegetables promptly to encourage plants to produce more. Squash especially tends to grow rapidly in hot weather. Keep an eye on zucchini.
* If your melons and squash aren’t setting fruit, give the bees a hand. With a small, soft paintbrush, gather some pollen from male flowers, then brush it inside the female flowers, which have a tiny swelling at the base of their petals. (That's the embryo melon or squash.) Within days, that little swelling should start growing.
* Pinch back chrysanthemums for bushy plants and more flowers in September.
* Remove spent flowers from roses, daylilies and other bloomers as they finish flowering.
* Pinch off blooms from basil so the plant will grow more leaves. New leaves have the best flavor.
* Cut back lavender after flowering to promote a second bloom.
Contact Us
Send us a gardening question, a post suggestion or information about an upcoming event. sacdigsgardening@gmail.com
Food in My Back Yard (FIMBY) Series
Lessons learned during a year of edible gardening
WINTER
Is edible gardening possible indoors?
Hints for choosing tomato seeds
Why winter is the perfect time to plant fruit trees
When to plant? Consider staggering your transplants
How to squeeze more food into less space
Plant a fruit tree now -- for later
Win the weed war by tackling them in winter
Tips for planting bare-root trees, shrubs and vegetables
Time to give vegetable seedlings some more space
Ways to win the fight against weeds
FALL
Dec. 16: Add asparagus to your edible garden
Dec. 9: Soggy soil and what to do about it
Dec. 2: Plant artichokes now; enjoy for years to come
Nov. 25: It's late November, and your peach tree needs spraying
Nov. 18: What to do with all those fallen leaves?
Nov. 11: Prepare now for colder weather in the edible garden
Nov. 4: Plant a pea patch for you and your garden
Oct. 27: As citrus season begins, advice for backyard growers
Oct. 20: Change is in the autumn air
Oct. 13: We don't talk (enough) about beets
Oct. 6: Fava beans do double duty
Sept. 30: Seeds or transplants for cool-season veggies?
Sept. 23: How to prolong the fall tomato harvest
SUMMER
Sept. 16: Time to shut it down?
Sept. 9: How to get the most out of your pumpkin patch
Sept. 2: Summer-to-fall transition time for evaluation, planning
Aug. 26: To pick or not to pick those tomatoes?
Aug. 19: Put worms to work for you
Aug. 12: Grow food while saving water
Aug. 5: Enhance your food with edible flowers
July 29: Why won't my tomatoes turn red?
July 22: A squash plant has mosaic virus, and it's not pretty
July 15: Does this plant need water?
July 8: Tear out that sad plant or baby it? Midsummer decisions
July 1: How to grow summer salad greens
June 24: Weird stuff that's perfectly normal
SPRING
June 17: Help pollinators help your garden
June 10: Battling early-season tomato pests
June 3: Make your own compost
May 27: Where are the bees when you need them?
May 20: How to help tomatoes thrive on hot days
May 13: Your plants can tell you more than any calendar can
May 6: Maintain soil moisture with mulch for garden success
April 29: What's (already) wrong with my tomato plants?
April 22: Should you stock up on fertilizer? (Yes!)
April 15: Grow culinary herbs in containers
April 8: When to plant summer vegetables
April 1: Don't be fooled by these garden myths
March 25: Fertilizer tips: How to 'feed' your vegetables for healthy growth
 Powered by California Local


