Master rosarian shares tips with Farmer Fred
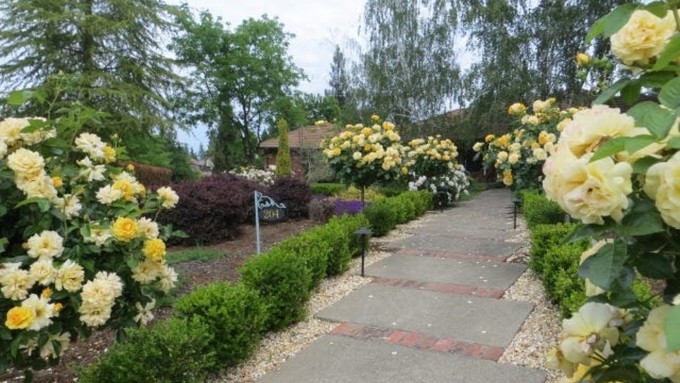
Julia Child roses line a path in Charlotte Owendyk’s garden. Charlotte Owendyk
When’s the best time to “make” new roses? In the spring, when bushes are growing fast and full of hormones.
Rose propagation via cuttings is easiest in April, May and June, says master rosarian Charlotte Owendyk, who grows hundreds of bushes in her beautiful Roseville garden. Fall is a close second.
That’s just a taste of rosy tips Owendyk offers as this week’s guest on Farmer Fred Hoffman’s podcast, “Garden Basics with Farmer Fred.” During episode 321, the pair discuss spring rose care basics including recognizing diseases and pests. Owendyk notes that hummingbirds love visiting spring rose gardens – they eat aphids! (Other birds like them, too.)
Listen to the podcast here: https://gardenbasics.net/.
Owendyk also shared some of her favorite roses such as ‘Julia Child,’ a yellow floribunda the color of butter. She grows several Julias as tree roses lining the walkway to her front door.
As for propagation, Owendyk has grown many, many new bushes from cuttings, especially miniatures and old varieties not available in nurseries. Don’t get discouraged from a poor success rate; only about half of the cuttings will root in even the best circumstances.
Cuttings are most likely to root if they were attached to a rose that just bloomed. Cut some flowers with longer stems, enjoy them in a vase until the flower is fully open, then use the stem for propagation.
Remember to label your pots! Otherwise, you’ll be left guessing which rose is which. It will be a long time before that little plant will bloom.
Have patience; the rose bushes you see in nurseries are three years old or more.
Farmer Fred shared Owendyk’s instructions in his newsletter:
Charlotte’s Tips for Propagating a Rose Plant
1. Water the rose plant the day before you take cuttings, so the cutting will be fully hydrated.
2. Use a 5-gallon pot and fill it half full with a mixture of 60% peat moss and 40% perlite. (Both retain water and will keep the cutting moist.) Dampen the mixture so it’s moist, but not soggy.
3. Select a healthy plant to take the cuttings. Avoid leaves with diseases and insects! Looking at the plant, pick the best part of the plant. Choose a stem that is vigorous and healthy and is on a healthy and vigorous cane. For softer growers, those with more pith (white inner portion of stem), use older part of cane since this type of stem has a greater possibility of rotting.
4. Select a stem where the rose has just cracked open to just fully open. At this stage, the buds along that stem will produce roots; increasing your success rate. Once the rose is spent, the plant is now telling the buds along the stem to begin producing a new flower.
5. Cut just below the eye (bud, where the leaflet is attached) since this is the most active growing part of the plant.
6. Essentially the cutting only needs two buds – one above the soil and one below. However, many propagators prefer to use a three-node cutting. Remove the bottom leaflet, since this node will be inserted in the growing medium (peat moss and perlite). The remaining one or two leaflets will continue to manufacture food for the cutting.
7. Wash the cutting with 1% bleach (one part bleach to four parts water). Use gloves! Wrap cuttings in a wet paper towel for 24 hours and place in a cooler. Cooler temperatures stimulate the formation of roots.
8. Dip the bottom stem in rooting hormone; use a powder not liquid. (Indolebutyric Acid is the leading plant hormone used to promote the formation of roots in plants and to generate new roots in the cloning of plants through cuttings).
9. Plant at an angle up to the bottom leaf, but make sure that the leaf doesn’t touch the growing medium. Do not crowd the cuttings. (Don’t forget to label your cuttings!)
10. Cover the pot with plastic and punch three or four holes for ventilation.
11. Place the pot in a window on the east side of the house. Check once a week to make sure that the growing medium is damp enough. If you have a heating mat, use it since it accelerates the process.
12. Pull off the plastic in 28 days. Water with diluted liquid fertilizer; acclimate new plants to outdoors.
13. Cut back the little rose plants several times to build up roots. When they look sturdier, transfer to separate pots. This process takes several weeks.
Comments
0 comments have been posted.Sacramento Digs Gardening to your inbox.
Flowers in My Back Yard Series
July 21: Thank Luther Burbank for these long-lasting beauties (Shasta daisies)
July 14: How to keep hydrangeas happy
July 7: Grow these bright cosmos for bees and butterflies
June 30: Agapanthus adds blue fireworks to the garden
June 23: Easy-care gazanias fill those hot corners
June 16: Daylilies are perfect for water-wise gardens (and a lot more)
June 9: Grow coneflowers for pollinators -- and yourself
June 2: Sunflowers capture Sacramento's summer attitude
May 29: Are your roses going 'blind'?
May 26: Zinnias are the summer flowers every garden needs
May 19: Plant dahlias now for late-summer flower power
May 12: Know your coreopsis from your bidens
May 5: Mums the word on Mother's Day weekend
April 28: Majestic Matilija poppy is worth a look
April 21: Celebrate roses, America's favorite flower
April 14: Small flowers with outsized impact
April 7: Calendulas do double duty
April 3: Make Easter lilies last for years to come
March 31: In praise of a pollinator magnet (small-leaf salvias)
March 24: Azaleas brighten shady spots
March 17: The perfect flower for beginners? Try zonal geraniums
March 10: Keep camellias happy for years to come
March 3: Fruit tree blossoms are a fleeting joy
Feb. 27: Are your roses looking rusty?
Feb. 24: Treasure spring daffodils now and for years to come
Feb. 17: How and why to grow wildflowers
Feb. 10: Let's talk Valentine's Day roses
Feb. 3: Why grow flowers?
Local News

Sites We Like
Garden checklist for week of July 26
Get fertilization and other garden chores done early in the week before those triple-digit temperatures arrive.
* Keep your vegetable garden watered, mulched and weeded. Water before 8 a.m. to reduce the chance of fungal infection and to conserve moisture.
* Water, then fertilize vegetables and blooming annuals, perennials and shrubs to give them a boost. Feeding flowering plants every other week will extend their bloom.
* Don’t let tomatoes wilt or dry out completely. Give tomatoes a deep watering two to three times a week.
* Harvest vegetables promptly to encourage plants to produce more. Squash especially tends to grow rapidly in hot weather. Keep an eye on zucchini.
* Feed vegetable plants bone meal or other fertilizers high in phosphate to stimulate more blooms and fruiting. Always water plants BEFORE applying fertilizer as well as after.
* Pinch back chrysanthemums for bushy plants and more flowers in September.
* Remove spent flowers from roses, daylilies and other bloomers as they finish flowering.
* Pinch off blooms from basil so the plant will grow bushier, with more leaves.
* Cut back lavender after flowering to promote a second bloom.
* It’s not too late to add a splash of color. Plant petunias, snapdragons, zinnias and marigolds.
* From seed, plant corn, pumpkins, radishes, winter squash and sunflowers.
* If your melons and squash aren’t setting fruit, give the bees a hand. With a small, soft paintbrush, gather some pollen from male flowers, then brush it inside the female flowers, which have a tiny swelling at the base of their petals. (That's the embryo melon or squash.) Within days, that little swelling should start growing.
Contact Us
Send us a gardening question, a post suggestion or information about an upcoming event. sacdigsgardening@gmail.com
Food in My Back Yard (FIMBY) Series
Lessons learned during a year of edible gardening
WINTER
Is edible gardening possible indoors?
Hints for choosing tomato seeds
Why winter is the perfect time to plant fruit trees
When to plant? Consider staggering your transplants
How to squeeze more food into less space
Plant a fruit tree now -- for later
Win the weed war by tackling them in winter
Tips for planting bare-root trees, shrubs and vegetables
Time to give vegetable seedlings some more space
Ways to win the fight against weeds
FALL
Dec. 16: Add asparagus to your edible garden
Dec. 9: Soggy soil and what to do about it
Dec. 2: Plant artichokes now; enjoy for years to come
Nov. 25: It's late November, and your peach tree needs spraying
Nov. 18: What to do with all those fallen leaves?
Nov. 11: Prepare now for colder weather in the edible garden
Nov. 4: Plant a pea patch for you and your garden
Oct. 27: As citrus season begins, advice for backyard growers
Oct. 20: Change is in the autumn air
Oct. 13: We don't talk (enough) about beets
Oct. 6: Fava beans do double duty
Sept. 30: Seeds or transplants for cool-season veggies?
Sept. 23: How to prolong the fall tomato harvest
SUMMER
Sept. 16: Time to shut it down?
Sept. 9: How to get the most out of your pumpkin patch
Sept. 2: Summer-to-fall transition time for evaluation, planning
Aug. 26: To pick or not to pick those tomatoes?
Aug. 19: Put worms to work for you
Aug. 12: Grow food while saving water
Aug. 5: Enhance your food with edible flowers
July 29: Why won't my tomatoes turn red?
July 22: A squash plant has mosaic virus, and it's not pretty
July 15: Does this plant need water?
July 8: Tear out that sad plant or baby it? Midsummer decisions
July 1: How to grow summer salad greens
June 24: Weird stuff that's perfectly normal
SPRING
June 17: Help pollinators help your garden
June 10: Battling early-season tomato pests
June 3: Make your own compost
May 27: Where are the bees when you need them?
May 20: How to help tomatoes thrive on hot days
May 13: Your plants can tell you more than any calendar can
May 6: Maintain soil moisture with mulch for garden success
April 29: What's (already) wrong with my tomato plants?
April 22: Should you stock up on fertilizer? (Yes!)
April 15: Grow culinary herbs in containers
April 8: When to plant summer vegetables
April 1: Don't be fooled by these garden myths
March 25: Fertilizer tips: How to 'feed' your vegetables for healthy growth
 Powered by California Local


