Learn how to root a cutting and grow your own rose bush

|
|
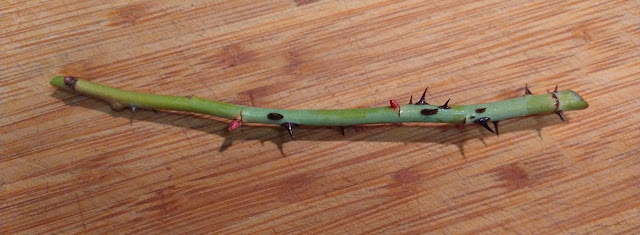
Just a stick? No, it's the start of a whole new rose bush. Rose propagation takes
patience but it can be very gratifying. (Photos: Debbie Arrington)
|
From little “sticks,” new roses grow.
Pruning season – January and February in Sacramento – also is prime time for rose propagation. A whole new bush can be produced from a single stem.
Roses have the ability to sprout roots from nodes or bud eyes, the area on a stem where a leaf was attached. Bud breaks – the first growth from those bud eyes – look like little red or pink nubs poking out. Those make the nodes easier to spot.
Growth hormones – signaling the plant to sprout – are now flowing through the plant’s vascular system as it prepares to break dormancy (if it ever was dormant this winter). Those hormones also help cuttings to take root.
Rose propagation from stem cuttings can be hit or miss; a 50% success rate is considered very good. So, make several cuttings of the same rose.
Propagation also takes patience. It will take two to three years (or more) for a cutting to develop into a full bush. But with some roses – particularly heritage plants that are no longer available in commerce – propagation may be the only way to preserve that rose variety and add it to your garden.
Master rosarian Dave Coop, former president of the Sacramento Rose Society, shared his method for rooting rose cuttings:
1. Choose a healthy stem with at least four nodes or bud eyes (two for above ground, two for below). Preferably, look for a stem that has bloomed. Cut off the spent flower and any leaves.
2. Prepare your planting medium. Dave mixes potting mix with extra perlite or peat moss to retain moisture. Mix this with water until damp (but not soggy). Pack soil into a 4-inch pot.
3. With a sharp paring knife, gently scrape the green waxy coating of the stem that will be underneath the soil.
4. Dip the scraped stem into rooting hormone powder, available at nurseries and home improvement centers. Chemical powders are available as well as organic options, such as white willow bark.
5. Use a pencil or similar size stick to poke a hole into the planting soil in pot. Gently put the powder-covered stem end into the soil, covering at least two nodes or bud eyes. Gently press the soil around the stem. Water.

|
|
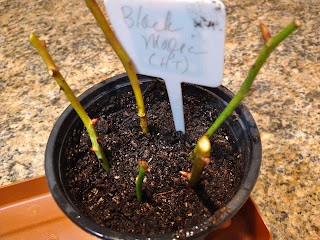
Cuttings from a Black Magic hybrid tea rose show
red bud breaks.
|
7. Place the pot in the shade, preferably on the north side of the house, and keep it watered and consistently moist. Don’t let the soil dry out! And keep it out of the sun!
8. A gentle tug on the stem will tell you if it has formed roots. The appearance of baby leaves is a good sign. After three to four months, the baby plants can be moved into partial shade where they get a little sun each day. But continue to keep their soil moist. (In summer, they may need daily watering.)
9. Once the stems are rooted, the survivors can be separated into individual 1-gallon pots to continue to form roots and grow. After a year, they can be transplanted into the ground.
Super-simple method: Ruth Coop, Dave’s wife, has success taking cuttings and sticking them right into the ground at the base of the mother plant. (This method works particularly well with potted roses.) That way, she easily remembers what the baby plant will be when it starts to grow – and it gets watered along with the mother bush. Once the baby plant is well rooted and growing strong, she transplants it into a separate pot.
Comments
0 comments have been posted.Sacramento Digs Gardening to your inbox.
Sites We Like
Garden Checklist for week of July 21
Your garden needs you!
* Keep your vegetable garden watered, mulched and weeded. Water before 8 a.m. to reduce the chance of fungal infection and to conserve moisture.
* Feed vegetable plants bone meal, rock phosphate or other fertilizers high in phosphate to stimulate more blooms and fruiting. (But wait until daily high temperatures drop out of the 100s.)
* Don’t let tomatoes wilt or dry out completely. Give tomatoes a deep watering two to three times a week.
* Harvest vegetables promptly to encourage plants to produce more. Squash especially tends to grow rapidly in hot weather. Keep an eye on zucchini.
* Pinch back chrysanthemums for bushy plants and more flowers in September.
* Remove spent flowers from roses, daylilies and other bloomers as they finish flowering.
* Pinch off blooms from basil so the plant will grow more leaves.
* Cut back lavender after flowering to promote a second bloom.
* It's not too late to add a splash of color. Plant petunias, snapdragons, zinnias and marigolds.
* From seed, plant corn, pumpkins, radishes, winter squash and sunflowers.